
The Administration Section of your CCB is only visible and can only be accessed by people assigned at the Site Admin (also known as Site Owner) level. Anyone assigned at the Contribute (also known as Member) level, will not see this section of the CCB.
Our staff is happy to assist Site Admins with any administration features.
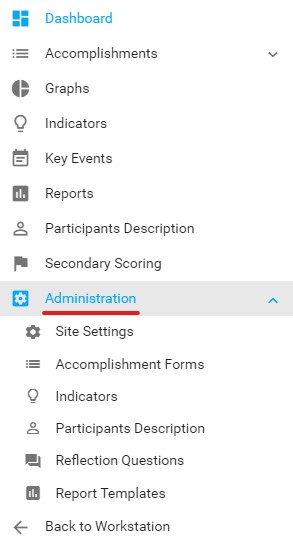
Administration Section
Site Settings
This is where you select settings that apply to the entire CCB.
- Default Form - select the Accomplishments form that displays by default on your dashboard and under View Data.
- Note: If you have more than one form within the same CCB, you can still select alternate forms to view and work with under the Accomplishments dropdown in your Left Navigation Bar. This setting merely establishes which form will load in initially, by default.
- Default Code - select a specific Code that will display in the three graphs at the top of the dashboard.
- Default Code Display As - change the Code name on the three dashboard graphs. Example: from "Community Change (CC)" to "Community Changes" (plural, to reflect more than one entry, presumably).
- Site Theme - select the preferred site color theme from an existing group of options.
- Display Metrics - select whether or not the three graphs will appear on your dashboard. We will sometimes turn this off for new sites that don't have data yet, or CCBs that aren't utilizing the Code field, which is rare but is an option.
- Site Logo - a file picker for uploading your site logo (.jpg file format only). KU staff can assist with this, so that all logos are created to proper specifications for size (300 x 145) and image quality.
Accomplishment Forms
- Our staff will work with you to create your initial Accomplishment form. You have the ability to make any needed edits to the form or, if you prefer, our staff is happy to make the changes for you.
- The basic steps to create or edit an Accomplishment form (please see the Managing Accomplishments page for detailed instructions):
- Go to Administration > Accomplishment Forms.
- Click on New to create a new form, otherwise click on your existing form, then on Edit.
- Enable Accomplishment Flag, Secondary Scoring, or Participant Description if you want to use those features.
- Add Fields (questions) as needed and assign those fields to Sections.
- Important note: Do not use quotation marks in your field names or question labels as this will cause major problems when you export your data.
- Add new Sections (groups of questions) to your form. Use the Display # field to place sections in a preferred (weighted) order on the form. Sections are utilized to trigger groups of additional questions, based on the selection of a previous response on the form.
- Set any Triggers to prompt additional/related questions as needed.
- Save the form.
Indicators
- Go to Administration > Indicators.
- Click on a field name to open a popup.
- Slide any toggles to the right for On Listing if you want that field to display on the Indicator listing. Otherwise, it is hidden.
- In Choices, enter the responses for that field, separated by a pipe ("I") for each potential response.
- Toggle the Text line entry for other available to the right if you want to add that option.
- Add any Help text.
- Click Save.
- Repeat as needed.
Participants Description
- If you would like to track participants data (such as specific breakdowns for demographic or geographic information related to the participants involved with an Accomplishment entry), then Participants Description Enabled needs to be activated under the Administration section. See Step 2 under Accomplishment Forms (above).
- Below are the basic steps to create a new Participants Description Type. For additional information see the Manage Participants Description page.
Create a new Participants Description Type:
- Go to Administration > Participants Description.
- Enter the Type Name, e.g. Demographic is a type, Geographic is a type.
- Click Save.
- Select the Type Name that you just created, then click Edit.
- Click the Add button, and enter an Option (e.g. Gender, Age, Race/Ethnicity, County, State, Custom).
- Enter a Display # to sort each Option in a weighted order.
- Move the toggle to the right if you want to include New Participants data in your tracking.
- Enter Choices for the Option (e.g., Male|Female|Nonbinary|Unknown), separated by a pipe between each potential response.
- Save.
Reflection Questions
There is a default set of reflection questions applied to each new graph type. To see those questions, go to an existing graph of the type you want to create (e.g., pie, bar, cumulative line), and click on Reflection Questions. The default reflection questions are all that most organizations need. Here is an example of default reflection questions for a bar chart:
1. What are we seeing?
- What pattern are we seeing in this distribution of activity?
- Which areas show more activity? Less?
2. What does it mean?
- What may have contributed to this pattern?
- What distribution of activities did the group intend, and how well did it meet it?
3. Implications for adjustment:
- Given what we are learning, what adjustments should we make (if any)?
- What specifically should we do to distribute activities as intended?
- What challenges need to be addressed to make needed changes? How can meet them?
For additional information about creating customized questions based on the graph type chosen, see the Reflection Questions page.
Secondary Scoring
- Secondary Scoring is an optional evaluation feature available to all projects using the CCB. By default, this section is not displayed until a decision has been made if it will be utilized for a project. Site Admins and/or KU staff need to determine who, within your project, will serve as Observer 2 and possibly Observer 3 (known as "tertiary scoring" or "scoring the scorer"). Access will need to be provided to them for the Secondary Scoring section. Documenters (Contributors) do not need or have access to this section.
- Site Admins/Owners, by default, have access to this section once it's enabled. The additional role of Data Admin should be used for anyone doing Secondary Scoring who isn't at an Admin/Owner level with other administrative responsibilities (e.g., form creation, Indicator creation, etc.).
- Site Admins and/or KU Staff also need to determine if Accomplishment Flags should be displayed to identify if there is Observer 1 and Observer 2 and possibly Observer 3 agreement/disagreement on entries. As a Site Admin, you select whether your Contributors (users) will be able to view Accomplishment Flags (red, green, yellow), which link to the related Secondary Scoring feedback.
- Before you can use Secondary Scoring, you need to enable it for the form:
- Go to Administration.
- Select Accomplishment Forms.
- Click on Form Name for the form you want, then click Edit.
- To enable Secondary Scoring slide the Secondary Scoring Enabled toggle to the right.
- If you want Accomplishment Flags to appear on the View Accomplishments table next to each entry, slide the Accomplishment Flag Enabled toggle to the right.
- Save your updated settings to the form.
For additional information, see the Secondary Scoring page.