
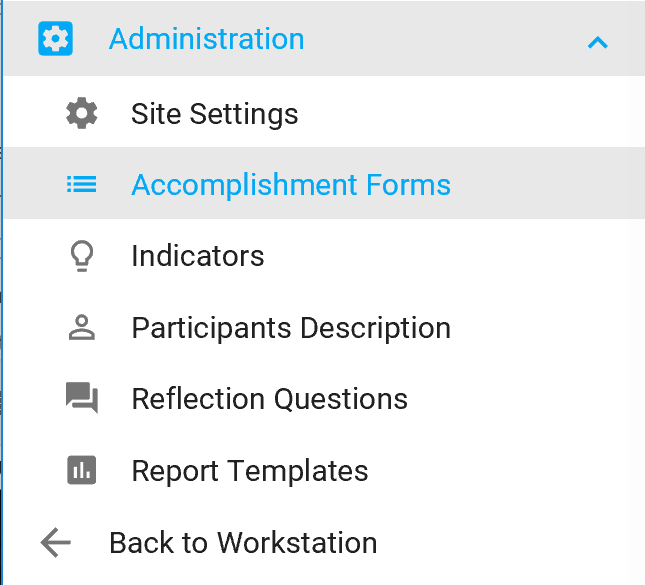
NOTE: These instructions are for Site Owners/Admins and KU staff only. Individuals assigned to Contributors/Members groups will not see the Administration options mentioned below.
Correct customization of the CCB form is crucial, as it constitutes the main tool for documenting in the CCB. Our staff will work with you to create your CCB Accomplishment form(s). As a Site Admin you have the ability to manage your forms if you want, but if you need technical assistance please contact us at toolbox@ku.edu, or by calling 785-864-0533.
The aim of customizing your CCB form is to collect data in the clearest, easiest, and most specific way possible. Form customization allows Site Admins to choose or create questions that will be displayed in the Enter Data area of the CCB. Each entry is referred to as an “Accomplishment.” It’s helpful to create an outline of the questions and response choices you want in your CCB before you begin modifying fields in the CCB itself. (KU staff can assist you with this task.) Think about what your initiative needs to track, and consider how you want the user to answer each question. For example, you might want to control how a user answers a given question by making it multiple choice (multiselect), which allows you to define the choices, or you might consider asking a question where the user needs more freedom to respond, and thus you would use a text line or text box to capture the response, whatever it may be.
Before you start
Contact a member of our KU staff to provide an Excel document containing the typical form template. Four tabs provide information necessary to set up your form correctly along with helpful definitions for coding each Accomplishment entry. There are quite a few choices to make for each question, things like whether the field/question is required or not, if you want to use it to create filters or graphs, what “type” of field it should be: Date, Yes/No, Dropdown (single-select), Multiselect, Numerical, Custom List, Text Line, Text Box, etc. It also describes the trio of questions required to set up Intensity Scoring for each entry and to let us know if you’ll be doing Secondary Scoring, whether or not you want Scoring Flags visible, plus adding Participants Description data to your entries. This Excel document gives you the opportunity to think through all specific questions and answers in one place. Whether you set up the form yourself or we do it for you, it is helpful to have this Excel template completed and up-to-date before the CCB form is created. The more you plan ahead before you start collecting data, the better off you’ll be in the end.
Creating a New CCB Form
- To create a new CCB form, or to manage an existing one, click on Administration and then Accomplishment Forms in the left navigation bar.
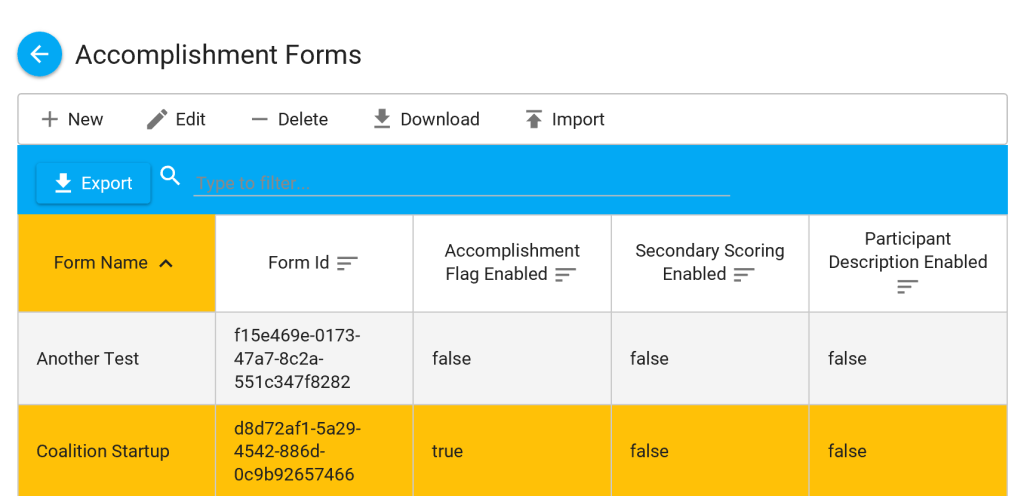
- The Accomplishment Forms section allows you to create, edit, delete, download, or import an Accomplishment form.
- New - create a new form.
- Edit - click once on the form, then click Edit to open it and make changes.
- Delete - this will delete the entire form you have selected.
- Download is one of the most useful resources inside of the Manage Forms section. It will save the form you built in a text file (.txt), with all Fields, Sections, Triggers, and Help configurations preserved. It is especially helpful when you want to develop a master form template to be used across several CCB subsites. Just click on Download when you are finished building your form to export the template (.txt). Save it to your computer, and you will be able to upload it to other CCB sites with the Import button.
- Import - allows you to import a CCB form (.txt file) you have downloaded.
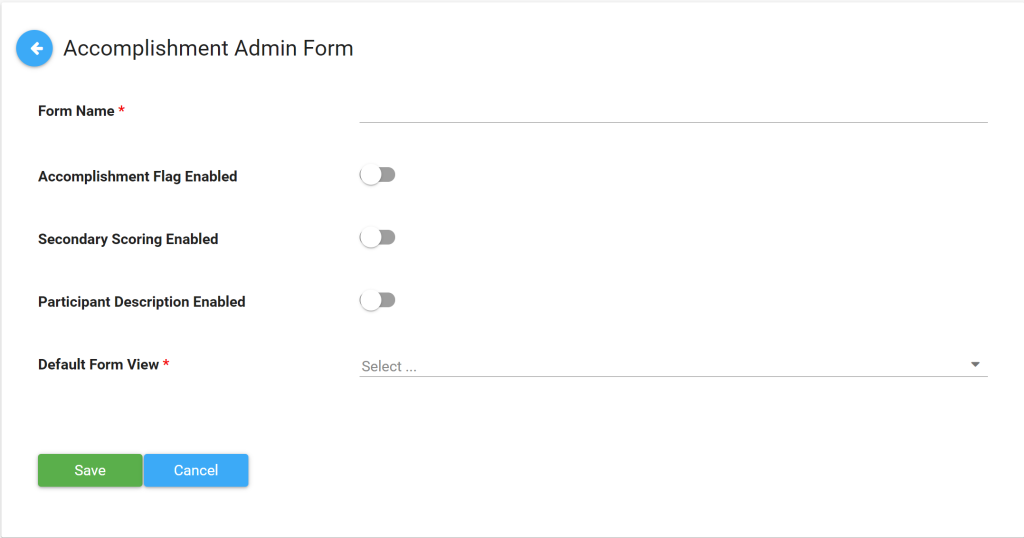
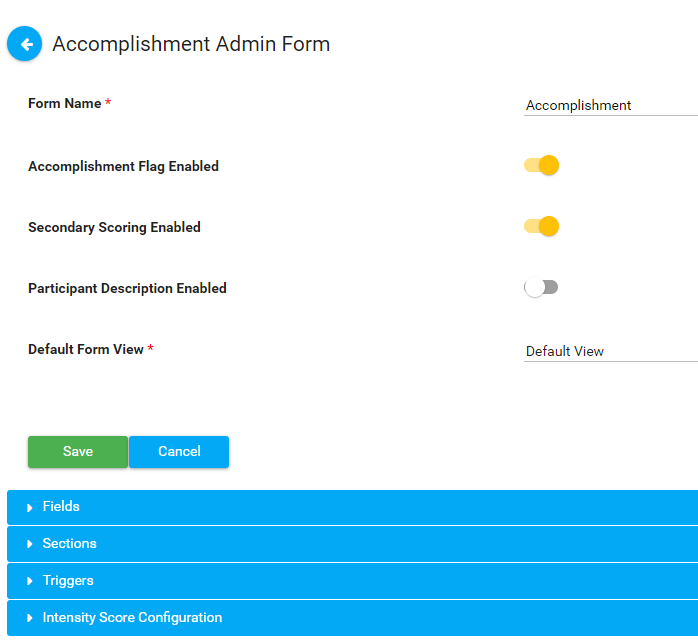
- Click New to create the form and set some general preferences.
- Form Name - Name the form, e.g., Douglas County Coalition CCB.
- Accomplishment Flag Enabled - Flags are associated with Secondary Scoring. If you're using Secondary Scoring, enable the Accomplishment Flag if you want flags to appear on the Accomplishments listing page (View Data). The first column on the listing will show either a green, yellow, or red flag, based on the level of agreement for the code selection between the initial observer and the secondary scorer. See more on Secondary Scoring.
- Secondary Scoring Enabled - Enable this if Secondary Scoring is to be performed on this form.
- Participant Description Enabled - Enable this feature if you are collecting participants' data (e.g., the number of people attending an event broken down by age, race, gender, geographic location, etc.). See more on Participants Description.
- Default Form View – This field shows a red asterisk, which means it's required, but the system will assign the Default View of this new form for you. If you want to change the view after you have created at least one custom Saved View, you can do that here.
- Click Save if you want to save the form.
- Click Cancel if you don't want to save the form.
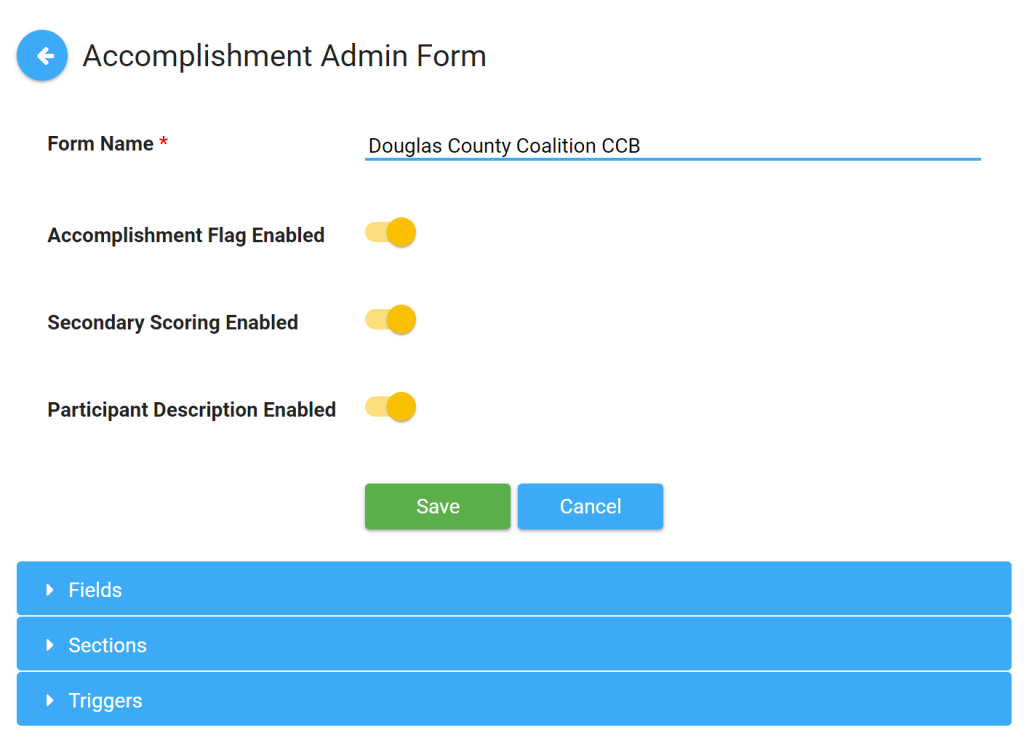
- Click once to select your form on the Accomplishments Forms page, and click Edit to begin developing your form. You will now see three expandable bars named Fields, Sections and Triggers added to your screen. Click on a bar to expand it and view information associated with that bar.
Sections Explained
- Sections are important for two reasons:
- Sections determine the display order for a group of questions.
- Sections are used for Triggers. See Creating Triggers for more details.
With the exception of a few system questions at the beginning of the form, each field/question you create is assigned to a Section and given a weighted order (number) within that Section. That's why you should create Sections before you create Fields (questions).
Some things to remember about Section ordering:
- Weighted numbers for Sections (and Fields) override alphabetical sorting order.
- It's a good preemptive practice to start numbering Sections at 10 and add others in increments of ten to leave room for potential future sections.
- Example: If you have your initial Sections weighted 10, 20, 30, 40, etc., then you find you need to insert a new section with more questions to be triggered after the one weighted "20," you can do so very easily by giving the new Section a weight of "22" or perhaps "25," etc. You have room to add more Sections without having to renumber all Sections that come after 20 to allow for the insertion of your new Section.
Sections and Triggers
- The Trigger system relies on Sections. A Trigger causes additional Sections of questions to display when a specific response to a prior question is made.
- Example: You create a Field called "Do you like ice cream?" If you answer Yes, a Trigger displays a related Section with more questions like "What is your favorite flavor?" and "What is your favorite brand?" If you select No as the response, you would not see those questions.
- NOTE: Triggers point to Sections, not individual Fields (questions) themselves.
- Every Field is housed in a Section. Navigate to the Sections bar and click on it to expand it.
Creating Sections
- Click Add.
- Enter Section Name.
- Section Names should be descriptive and concise. Most of the time, they will not be visible on the front end of the form where users enter data.
- Best practices for naming Sections:
- Many Sections are created based on the user's response to the Code question. If the Fields in your Section should only be visible for certain Codes, they should be named accordingly.
- Example 1: "CC, CA, and SP" as a Section Name indicates the Fields within that Section are only Triggered if the user selects one or more of those Codes (CC, CA, or SP).
- Example 2: You might have multiple Sections triggered by the Code responses CC, CA, or SP. This happens when an additional set of questions is Triggered between two related questions on the form. If your third question in the "CC, CA, and SP" section has an answer of "XXXXX," which Triggers questions related to it, your Section-naming convention should look something like this:
- "CC, CA, and SP - 1"
- "(Abbreviated Name of Question 3): XXXXX"
- "CC, CA, and SP - 2"
- This will help you tell at a glance what's happening, without having to look at all of the Fields, Sections, and Triggers to determine which response is triggering an additional Section. You can tell by looking at this example above that in the middle of the "CC, CA, and SP" -related questions, a response of "XXXXX" to the third question has Triggered more related questions, and it is then followed by questions related (again) to "CC, CA, and SP," this time noted with the number 2 after it to define and separate the two "CC, CA, and SP" sections.
- Move the toggle to the right if you want the Section Name Displayed. This will display the Section header when a users creates a new entry. It will require you to use a more "presentable" naming convention than the one described above, since users will see it on the form. Here is an example of a "CODE the Activity" section header.
- What you enter when setting up the form:

- What displays in a new accomplishment:

- Enter the Display #, which is the numerical "weight" for the Section. When you assign display numbers to your Sections, you should start at 10 and add others in increments of tens to leave room for potential future Sections in between.
Creating Fields (Questions)
- In the Accomplishment Admin Form section, click and expand the Fields bar:
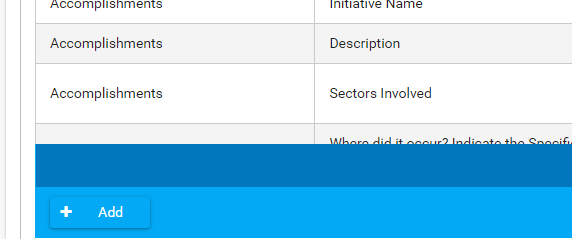
- Fields, also known as Questions, can now be added to your form, either in a designated Section, which allows them to be grouped together for proper order and flow or for Triggering the Section of questions as a whole, or you can also add a field without assigning it to a Section. All unassigned fields will appear at the top of the form in the order they are weighted (more on "weighting" below) or in alphabetical order if they share the same weight.
- In order to add a new question to the form, click the "+ Add" button at the bottom of the Fields section:
- You will then see a popup where you can select the Column Type:
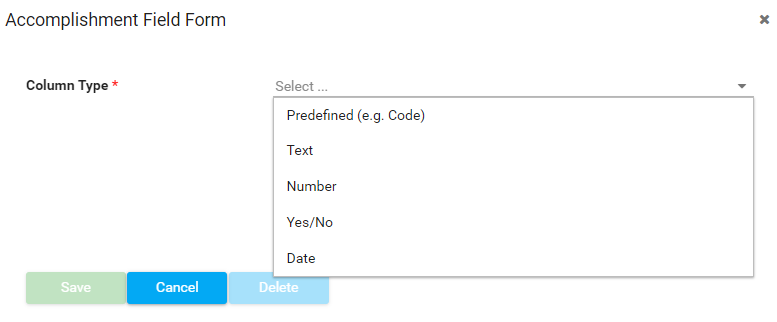
- Predefined (e.g., Code) - This Column Type contains a few Filed Types that have been hard-wired with special capabilities and are intended for specific uses and displays on your CCB. These fields can be used only once on your form:
- Code - This Predefined field must be used if you are coding Accomplishment entries. It is tied directly into the visual dashboards for graph displays, but more importantly it's tied to Secondary and Tertiary Scoring functionality within a CCB. Typically, this is displayed as a Check Box (Field Type) on the front end of the form, which is essentially a multiselect list with all options displayed, instead of having them scrollable within a contained window.
- Description - This Predefined field must be used for your basic description of the Accomplishment entry and will display on your CCB's dashboard. This is a Text Box field type.
- Frequency Count - This Predefined numerical field has multiplier capabilities and should be used, if needed, for a "Frequency" question where an Accomplishment activity is repeated more than once for any entry.
- For example, if a group is meeting four times a month, and the entry is the same for each meeting, the Frequency question could be used to indicate the number of times this activity occurs. By entering the number "4" in the Frequency field, any graphs created for the questions on this form will incorporate responses and multiply them by "4" on the graph.
- Note: there are additional Predefined Field Types available in the dropdown, but they aren't generally utilized on CCB forms, at least not for now.
- Text - This Column Type includes any field where the response will appear as text, and there are several text Field Types to choose from:
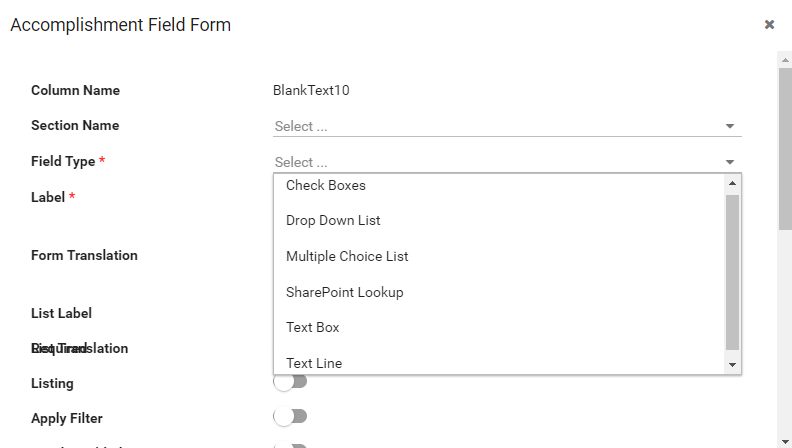
- Check Boxes - this Field Type is a list of responses that are all predetermined and visible on the form. Visually, it looks and functions like an expanded/opened Multiple Choice List without the scrolling bars in a contained window. Users may select more than one predetermined response from the list.
- Drop Down List - this Field Type an expandable list of predetermined responses. Only one response/answer can be chosen.
- Multiple Choice List - this Field Type an expandable list of predetermined responses/answers. Users may select more than one response/answer from the list.
- SharePoint Lookup - Lookup Lists (see Managing Lookup Lists below) are no longer associated with Microsoft SharePoint or connected to any SharePoint WorkStations on myctb.org. They are managed and maintained entirely within the CCB system. Lookup Lists are helpful when you want to have a longer list of responses that can be used on multiple questions within the same form, or in multiple CCBs within or even outside of your initiative's Site Collection.
- Note: Lookup Lists must be created first, then added to a specific CCB form for use. (See Managing Lookup Lists.) After a list has been created and added to the form, it can then be selected as a Field Type under the "Text" option for Column Type.
- Text Box - This field type is for write-in responses. It allows for longer-form answers to questions.
- Text Line - This field type is for write-in responses. It allows for brief answers to questions.
- Note: Write-in responses for Text Boxes and Text Lines are generally not graphable, since there are unlimited variables regarding spelling errors and punctuation inconsistencies. If you wish to graph responses to a Text question, consider using one of the predetermined Field Types for it instead: Check Box, Dropdown, Multiple Choice, Lookup List.
- Number - this Column Type is a numerical field, although it shows up as "Text Line" under Field Type in the Admin section. It offers two Numeric Type options: "Show whole number only" and "Show number with decimal places." Number fields are graphable, and calculations can be utilized on graphs, as well (sums, etc.)
- Yes/No - this Column Type is a tri-toggle, and for that reason, it's not ideal for use on a CCB form anymore. Consider creating Yes/No questions as a Dropdown instead with the choices of "Yes" and "No."
- Tri-toggle configuration offers three states: Null (meaning nothing has been selected), Yes, and No. Users can click through the three responses (Null, Yes, No) in an endless cycle. Tri-toggles cause issues with graphing, filtering, and saved views, and for that reason we suggest creating a Dropdown question (with Yes and No) instead.
- Date - this Column Type is formatted for entering calendar dates, which can be used for graphs, filters, and also can be filtered in date ranges. On the front end of the form, dates can be entered using a "calendar picker" (icon) or by typing them in numerically.
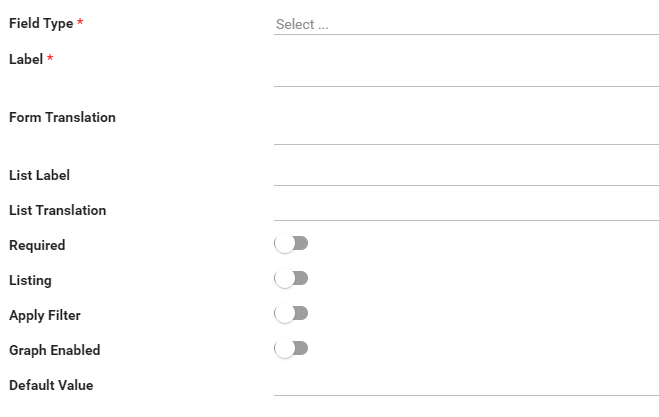
- After you have selected your Column Type and Field Type, the following additional options can be filled out. Anything with a red asterisk next to it is required:
- Label - This is how a question will appear on the front end of the form for users to fill out. It's important to be clear and concise with your Label, using as few words as possible when creating the question. It's also essential that the question's wording be unique to a particular CCB form. If a response to a previous question on the same form includes an "Other" option, which then triggers a new text line, avoid a generic label that doesn't identify what the "other" is referring to. Example: "If OTHER, please specify." You want to identify the source in this label, so something like "If OTHER code, please specify," or "If OTHER strategy(s), please specify." That makes the question unique and shows what the "Other" is referring to. Questions on the same form that are worded exactly the same will throw errors when graphing and filtering.
- Form Translation - although it's not used very much, you may type an alternate version of the question in a different language to help prompt multilingual users. The Label would still be in English (for example), but the Form Translation would include the Spanish translation of the question (Label). Form creators would need to provide any translations. The downside is that the responses/answers to the question would still be in English (only), unless each response included both languages for every response listed, which is not ideal and can get crowded and confusing. Still, if it helps users out, it's available.
- List Label - this is helpful to shorten the actual Label (question) for downloaded data to Excel or for use in a table. For example "Your Name" (on the form) could be shortened to "Name" (on the List Label). This shorter name would be at the top of the columns on an Excel spreadsheet.
- Downside: Any List Labels that don't match the Labels with the exact same wording would need to be manually mapped to connect them when doing any importing of revised data through Excel. For forms with 60+ questions, this can be an arduous task.
- List Translation - this works the same as Label Translation and allows the shorter version (column head) in an Excel document to be in a different/alternate language. It is rarely used.
- Below the options listed above are four toggles, where you may enable any of the following by sliding them to the right and turning them "on":
- Required - enable this option if the question should be required for the user to fill out.
- Listing - this refers to the "Default View" on a CCB form. You can determine which fields (by default) are visible when a user clicks on View Data. Ideally, you should limit the number of fields/columns in your Default View to four or five (perhaps six?), so they are not crowded together and hard to read. You may adjust the fields on the (default) using the Listing feature, by toggling them on or off.
- Apply Filter - If you would like a question to be available for filtering, either in a custom view, Saved View, or on a graphed question, enable this by turning it on. In general, it's a good idea to enable filtering for all questions (by default) that are not either Text Boxes or Text Lines.
- Graph Enabled - If you would like a question to be available for graphing, either in a custom view, Saved View, or on a graphed question, enable this by turning it on. In general, it's a good idea to enable graphing for all questions (by default) that are not either Text Boxes or Text Lines.
- Note: if you want to graph a question, you must also enable "Apply Filtering." You can't graph a question without the ability to filter the responses on a graph.
- Default Value - If you want to have a default response to a question, you can enter it here. For example, if you have a question with "Yes" or "No" as responses, and you want the default to be "No," you can type it in here. Or if your responses are red, green, and blue, and you want "green" to be the default, type it in here.
- Note: if the default response (example: "green") triggers additional questions on your form, then that triggered section will load in as already triggered on the form.
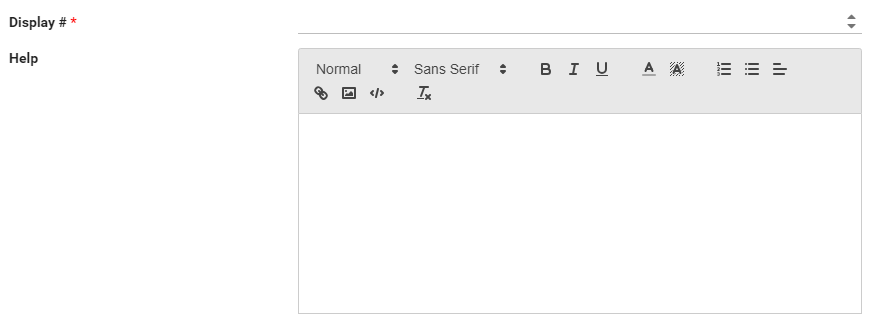
- Display # - this refers to the numerical weight of a field/question. "Weight" is a numerical value assigned to a question that forces it to appear on the form in a specific order. By default, un-weighted questions appear in alphabetical order, but you may (and typically do) want your questions to appear in different order. For example, the questions for "Date," "Description," and "Your Name," would appear as such alphabetically, but if you wanted "Your Name" to appear before "Description," you would assign weighted values to the three questions, like this:
- Date - give it a weighted value of 10.
- Your Name - give it a weighted value of 20.
- Description - give it a weighted value of 30.
- Note: the strategy for using numerical increments of 10 as values is preferred in case you need to add questions in between existing questions later on. If you were to weight the above questions as 1, 2, and 3, and you are asked to add a question after Date but before Your Name, you would have to renumber both Your Name and Description and any additional questions that followed it in that section. This can be a lengthy process if you have to renumber 15 or so questions to keep them in the desired order. By using increments of 10, you can easily insert a new question with a weight of 15 between Date and Your Name and not have to renumber all of the questions that follow the new one. In fact, you can add as many as nine additional questions between the initial questions without having to renumber the weights.
- Note: the Display # (or weight) applies only within a given section. So if the fields/questions above are assigned to a Section called "General Questions" and you had more questions in a Section called "Strategies," you can (and should) start your numbering over in the latter section, beginning again with 10, 20, 30, and so on. Sections are also given weighted orders when they are created, so they will appear as a block of questions in a specific order that you determine.
- Help - this is where you may enter any text prompts for users to assist them in answering the question. The Help prompts can be formatted (bold, italics, bulleted lists, hyperlinks) to help users make more informed decisions with their responses.
- For example, you can provide definitions for each of the Codes or even link to a PDF "code book" that goes into far more detail about entering Accomplishments.
- When anything is entered in the Help box (pictured above), a small blue "question mark" (icon) will appear next to the question on the form. Users may click on the question mark, and it will open a popup with your Help text for them to review.
- Display # - this refers to the numerical weight of a field/question. "Weight" is a numerical value assigned to a question that forces it to appear on the form in a specific order. By default, un-weighted questions appear in alphabetical order, but you may (and typically do) want your questions to appear in different order. For example, the questions for "Date," "Description," and "Your Name," would appear as such alphabetically, but if you wanted "Your Name" to appear before "Description," you would assign weighted values to the three questions, like this:

- Once you have finished creating your new field/question, scroll to the bottom of this popup and click Save.
- Note: You will not be able to save a question until you have filled out all required information on the popup. The Save button will be grayed out (see above image) and disabled until all required information is provided.
- If you want to delete an existing field/question from a form, you do that here, as well. Select the field on your form, which opens the popup editor. Then click the Delete button shown above to remove the question (permanently) from the form.
Modifying Fields (Questions) with Existing Data
Modifying an existing response on a form
After your form is established and in use, you may find it necessary to update an existing response to a question, most likely for clarity or to add or remove listed choices. For example:
- Original response: "All Children"
- Updated to: "All Children in School."
Your first step would be to update the response on the form itself. By doing so, any new data entered will feature the new response, but your historical data still has the original response of "All Children." You have two options moving forward:
- Leave the historical data alone. Prior entries are not affected by this form change. By updating the response, however, the older response of "All Children" won't show up anymore in your filters or on graph options. Responses can only be filtered or graphed if they exist on the current form.
- This will require you to export your historical data to an Excel (.csv) file in order to work with it for filtering and calculations, so please keep that in mind. The data is still there and can be exported at any time.
- The other option is to modify existing data to match the updated form.
- Export all data to an Excel (.csv) file, update any entries with the old response to reflect the new response, then import the modified entries back into your CCB.
- Be sure to export all three Observers (1, 2, and 3) when modifying existing responses, so they stay aligned in the system. (See Importing Accomplishments Data below.)
Potential issues when modifying an existing response
- If any Triggers were associated with your original response before it was modified, those Triggers will break and no longer function after the response is updated. You will need to delete (not modify) Triggers associated with an old response, and re-create them, linking them to the new response. Updating a broken Trigger, rather than deleting and recreating it, can lead to problems with Triggers not working, so be sure to re-create them to avoid issues.
- Any Graph that features the old response, either from the question itself or as a filtered response on the graph, will break and need to be rebuilt as well.
Other things to consider
- Modifying the text of an existing question (the label itself) won't affect historical data. You may need to update titles to graphs that still reflect the older wording, but it has little impact on your form or the data collected.
- Deleting a question (entirely) from an existing form will delete all historical data associated with the question. If you remove a question, you remove everything associated with it.
- If you have significant updates to an existing form, due to changes in your initiative (such as a new grant cycle or expanded directives), consider leaving the current form with all prior data intact. Then clone that form and give it a new name that reflects the new cycle (e.g., "Accomplishments 2024-2027"), then modify your cloned form instead. Since no data has been associated with the cloned form (yet), you will not compromise historical data in any way. Instead you will have two forms in your CCB (old and new), which can be combined together in graphs, where questions/responses still align.
Triggers Explained
What are Triggers?
- A trigger is a response mechanism that allows additional subsets of questions to display when a specific answer or multiple answers are chosen from a single previous question. For example, assume you create a question about ice cream that reads "Do you like ice cream?" If you answer Yes to this question, a trigger would display a Section with one or more additional questions like "What is your favorite flavor?" and "What is your favorite brand?" If you say No, then you would not see that section with those questions.
- Here's another example that is more relevant to the CCB. When a user selects Media from the Code field, all of the questions related to Media will be displayed on the entry form. If the user chooses a different Code, then other related questions would be displayed instead.
- It is important to place all relevant questions in the associated sections (e.g., questions about your resources acquired or time donated would go in the Resources Generated section). A trigger applied to the response in the Code Field (e.g., Community Change) will display all of its relevant questions associated with the code(s) selected.
A Few Important Things to Know about Triggers
- Triggers are created for one or more responses to any single question. As an example, you might have Yes, No, and Maybe as the three responses to a question. You may want both Yes and Maybe to trigger an additional section of questions, but a No response wouldn't trigger that section. You can choose multiple responses from a single question to trigger a new section.
- Triggers from a single question can make one section or multiple sections display, based on the response(s) from that single question.
- It is not possible to have a response or responses from multiple questions trigger the same section. You might think of it this way: It's a "one-to-many" relationship and function. One source can trigger multiple additional sources. But multiple sources cannot trigger the same exact source. More about this is covered in Creating Triggers (below).
Creating Triggers
Before You Begin
- You must have a Source Field (question) created first as either a dropdown or multiselect that involves predetermined answers. Triggers cannot be created from any other type of field/question, such as write-ins (text lines or boxes).
- Create a new Section first that will display from this Trigger, so you can select it when you build your Trigger.
- Once you have your Source Field and Section established, you are ready to link them together in a Trigger.

Steps to Create a Trigger
- Click the Triggers bar to expand it, then click Add.
- Select the Source Field you have already created from the dropdown menu.
- Select the Target Section you have already created from the dropdown menu.
- Note: If you want more than one section to display from this same response, you will need to created additional Triggers, one for each separate Section that will display.
- Again, it is not possible to create Triggers from more than one question that initiate same triggered Section. You are creating conflicting commands simultaneously if you do it. Example: It's like telling this system (through its coding) to "turn left" and "turn right" at the same time. If you create Triggers from multiple questions asking different things but pointing to the same Section for display, you will cause the form to malfunction overall. Likely, the result is that none of your Triggers will work, and no new Sections will display when a response is selected from any of the multiple source fields. (It works as a "one-to-many" command, not a "many-to-one" command.)
- Select the Trigger Value(s).
- Note: Multiple responses from the (single) question can be selected to display this new Section.
- Save the Trigger.
- Repeat as needed for additional Triggers.
- Click Save to save the form.
Managing Lookup Lists
Lookup Lists are extremely helpful when you want to maintain a longer list of responses that can be used on multiple questions within the same form, or in multiple CCBs within or even outside of your initiative's Site Collection.
For example, if you have the same list of 25 names or counties or organizations that you want to include as responses to more than one question, a Lookup List allows you to maintain the list in one place. If you update (add, delete, modify) values on the list, you do it in once within the list, and anywhere that list is used for responses, it will update automatically.
- Note: Lookup Lists are integrated within the CCB system now and are no longer tied to SharePoint custom lists or SharePoint WorkStations.
One of the improvements in having Lookup Lists maintained within the CCB is they can now be used by all initiatives systemwide. This is helpful if more than one CCB collection would like to have (for example) the full list of counties for the state of Kansas as responses to a "county" question on your Accomplishment form. A Site Administrator/Owner or System Administrator will need to add the existing list to the CCB first.
Users at the Member level can add, modify, or delete responses, however they are welcome to reach out to Administrators/Owners for help with this, as well. When in doubt, users should be encouraged to contact a Site Admin/Owner.
- Note: All users should be careful about deleting or modifying existing responses on a Lookup List, since doing this will not update historical data, and it could cause issues with existing graphs and saved filtered views. If you want to add a new response on a Lookup List, it will not affect your historical data, but keep in mind that everywhere the list is used, the new response will appear.
Creating a Lookup List
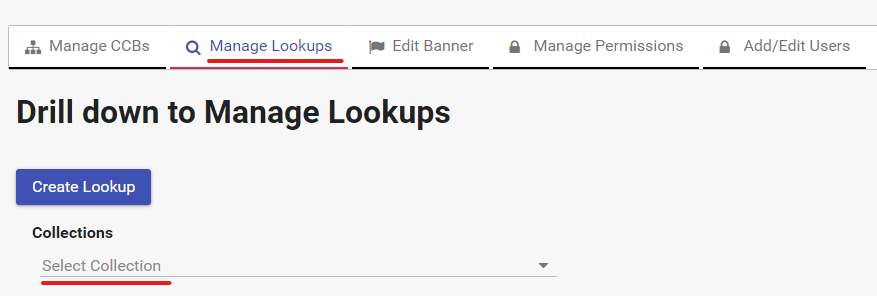
- Navigate to the CCB Site Administration page and select Manage Lookups from the toolbar.
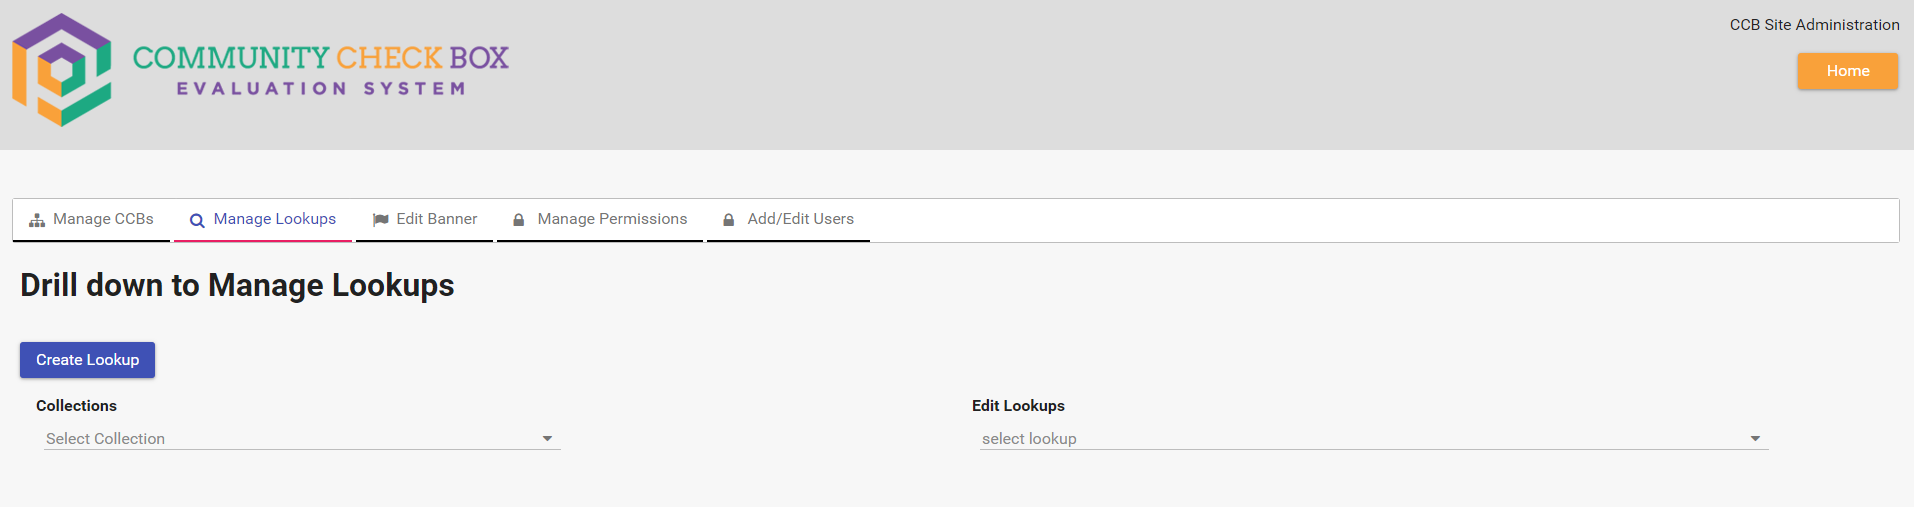 (Click the image above to enlarge.)
 - Click Create Lookup.

- Give your Lookup List a descriptive title that helps anyone in the CCB system understand what it is and how it's being used.
- Example: avoid calling your list "Your Name - Lookup" without indicating where it's intended to be used. If you're creating the list as responses for the "Your Name" question on a CCB form for ThrYve, then call it "ThrYve Name - Lookup" or "ThrYve - Your Name Lookup." This will tell Site Admins/Owners the origin of the list. If they want to add this list to another initiative or form within the CCB system, that's fine, but they should know it's maintained and was created for the "ThrYve" CCB initially.
- After you've given your list a title and saved it, you can then Edit Lookup Values.
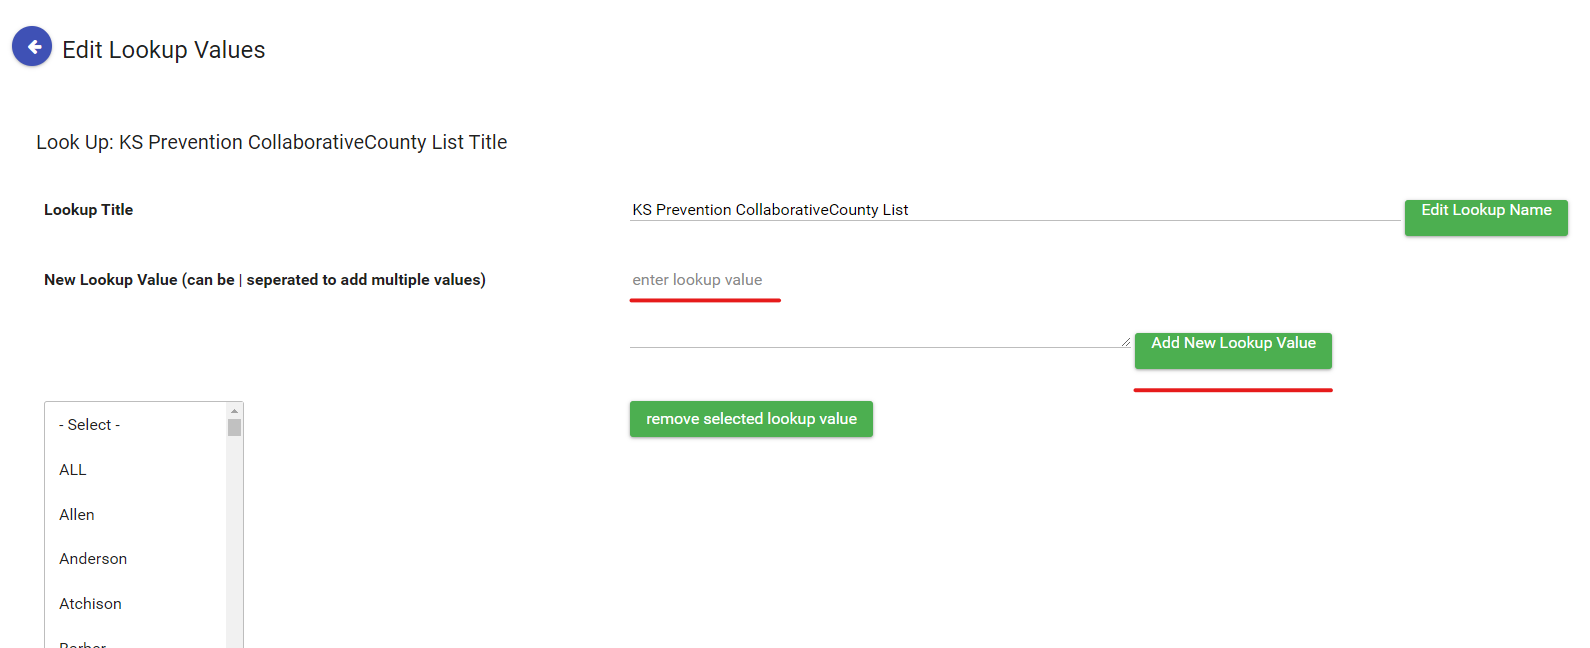 (Click image above to enlarge.)
 - You can add single values/responses by typing them into the blank space where it says "enter lookup value," then clicking the green button that says "Add New Lookup Value." It's a good idea to scroll through the existing values (if it's already established as a list) to see if the response is already there before you add it.
- You can also add multiple values at the same time. Just separate them with a pipe "|" the same way values/responses are added to the Accomplishment form.
- Note: Make sure there are no spaces on either side of the pipe delimiter, since this will cause graphing issues and calculation issues on your Accomplishment form. The pipe comes right after the last visible character in the first response and directly before the next response (no spaces on either side).
- If you need to remove/delete an existing value on a Lookup List, select the value from the scrolling list, then click the green button that says "remove selected lookup value."
- Note: When you remove existing values from any Accomplishment questions (lookup, multiselect, dropdown, check boxes), this may affect existing graphs and saved views. It will not affect historical data, but you would need to export all data to Excel (.cvs) in order to access past entries with deleted values.
Adding a Lookup List to a CCB Form
- Navigate to the CCB Site Administration page and select Manage Lookups from the toolbar.
- Below the Create Lookup button, select the Site Collection you want to manage from the dropdown list under Collections.
- After that, additional dropdowns will be revealed to select the specific CCB from the Site Collection and the specific Form from the CCB (since in some cases, there is more than one form within a CCB):
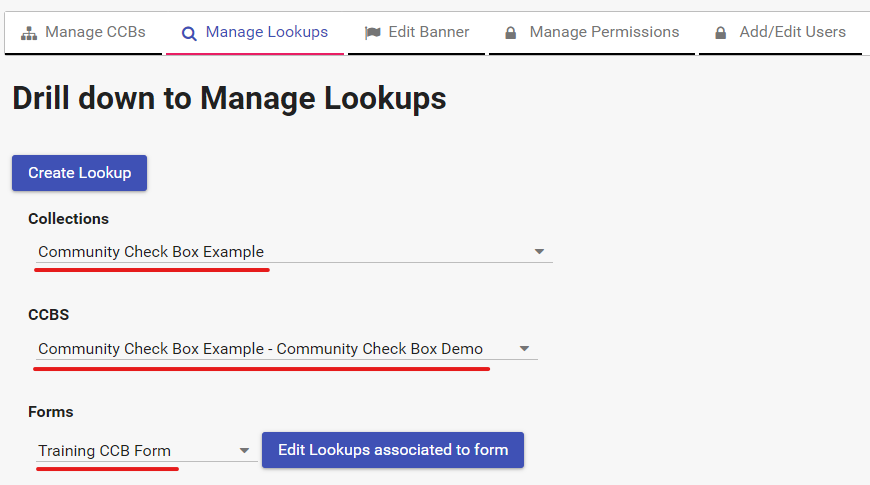
- After you have selected the Site Collection, the CCB, and the Form, click the button that says Edit Lookups associated to form.
- You will then see a two-columned page called Edit Lookup:
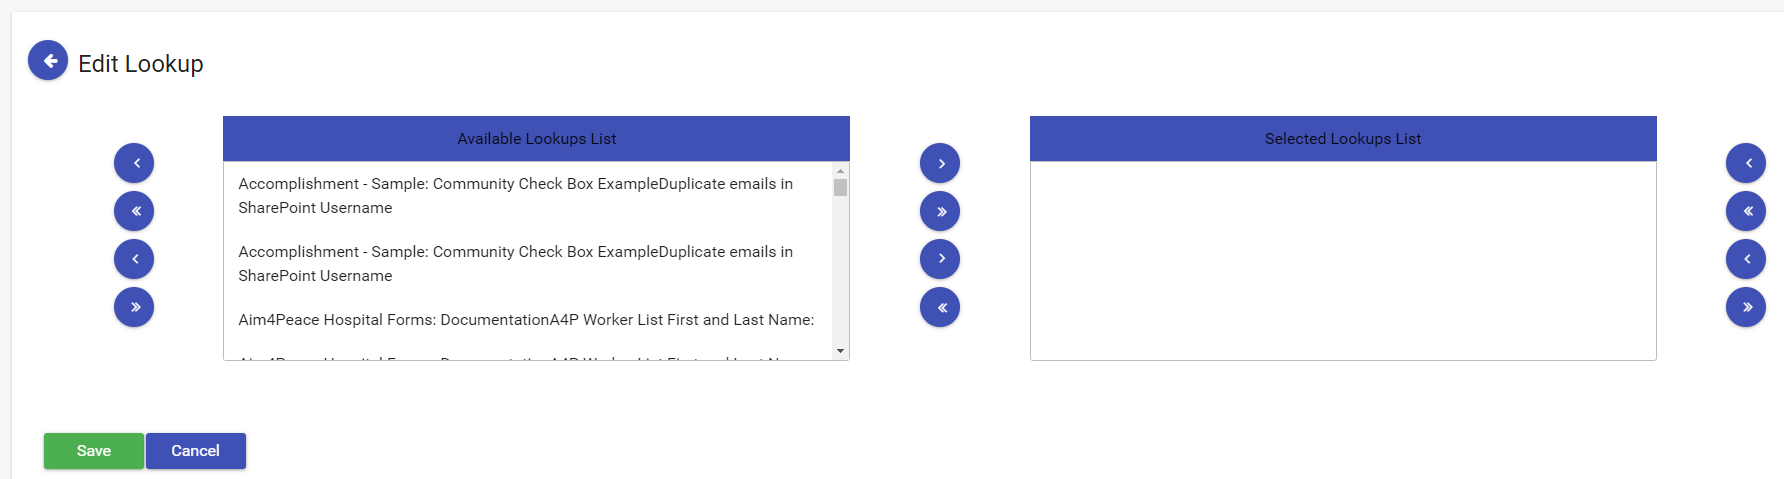
(Click the image above to enlarge it.) - The left column contains the names of all existing Lookup Lists systemwide. This list includes the source CCB name (first), followed by the list name right after it. This will help you better understand where the Lookup List originates.
- The right column displays any Lookup Lists already added to the form for use. IF there are none listed, then no Lookup Lists are currently available for use on the CCB form.
- If you wish to add a Lookup List to a CCB form, select the list by its name in the right column, then click the forward arrow ">" to the right of the scrolling list. You will see the Lookup List's name appear in the right column.
- Repeat the process if you want to add more Lookup Lists to the selected CCB form.
- When you are finished, click Save.
- You can now create a question on your form that uses the Lookup List(s) as answers/responses to the question.
Intensity Scores Explained
- Intensity Scores provide you with a clearer, quantifiable indication for the “dose” of the intervention being delivered in the community. Higher intensity community policies and programs are associated with improved population-level outcomes.
- Duration, Reach, Strategy, and Intensity Score fields must be created first, before the scores will calculate. The first three fields must be set as dropdown lists (not multiselects). If you do not see your Duration, Reach and Strategy questions from your form in the Intensity Score Configuration menu, go back to those fields and change them to dropdowns. We usually put the Intensity Score (calculation) field at the very bottom of an Accomplishment entry form. Once it is set up, users will not be able to enter data into that field because the Intensity Score is automatically calculated by the system once the entry is saved. You must create the destination field first as a numerical with decimals, then select it for the auto-calculation in the Intensity Score Configuration menu.
- We also provide the option of including Goal and Target questions in the calculation of the intensity scoring. Each categorical variable is converted to a weighted number and then combined and averaged using a automated formula.
- Results from the Intensity Score field are graphable.
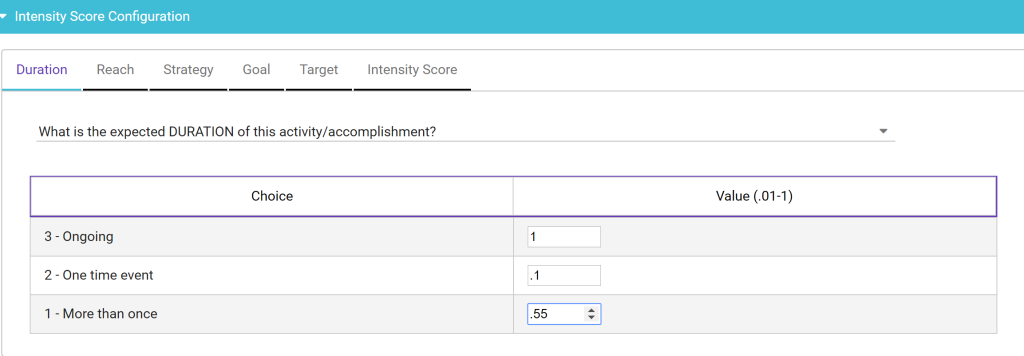
An Example of How Scoring Is Applied
- Duration
- One-time event=0.1
- More than once = 0.55
- Ongoing = 1.0
- Reach
- Low = 0.1
- Medium = 0.55
- Ongoing = 1.0
- Strategy
- Providing information & enhancing skills = 0.1
- Enhancing services & support = 0.55
- Modifying consequences = 0.55
- Modifying access, opportunities & barriers = 1.0
- Modifying policies = 1.0
- Formula= (Duration + Reach + Strategy) / 3
If you also use Goal and Target, the formula will be (Duration + Reach + Strategy + Goal + Target) / 5. Please talk to our research staff if you have questions about this scoring.
Creating Intensity Scores
- In the Accomplishment Admin Form, click the Intensity Score Configuration bar to expand it.
- Under the Duration tab, select the related question for duration from the dropdown. If you don't see it, go back to that field and ensure it has been setup as a dropdown question, not a multiselect.
- The responses you have entered will display below the question. Add a numerical value to each response. We will use the values just mentioned.
- Click the tab for Reach, and select the related question that tracks reach.
- Enter the numerical values you want for the Reach question.
- Click Strategy and select the question that tracks strategy.
- Enter the numerical values you want for the Strategy question.
- If you wish to include Goal and Target (which is not common but possible), click on those tabs and add the values.
- Click on the Intensity Score tab at the end of the row, and select the Intensity Score field you created for the destination of this auto-calculation.
- Click Save.
An example of responses with suggested numerical values has been provided on the Excel document template for Accomplishments, which can be requested from our staff.
Importing Accomplishments Data
NOTE:
- Only System Admins and Site Admins have the ability to import Accomplishments data into a CCB. The link will be grayed out for everyone else.
- The import file must be an Excel document in the standard .xlsx format, not the older .xls format.
- You must import more than one row of data in your file, or you will receive an error message. If you have just one row, please enter it manually.
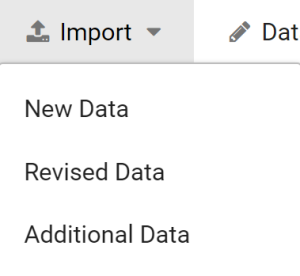
The Import function is extremely useful for many reasons. It allows you work with larger amounts of your data in Excel, then import New Data, Revised Data, or Additional Data to an existing CCB.
The Evolution of Your Data
- As your CCB form grows and develops, you may find you need to revise a response to a dropdown or multiselect question. Initiatives change over time, and there are a variety of reasons why you might need to update existing data in addition to updating the form itself. Perhaps an older/outdated response has already been selected on several or maybe even hundreds of Accomplishment entries. Perhaps you need to add or remove questions entirely. You have options when it comes to handling data revision.
Things to Know First
- If you need to add a response to an existing question on a form, there is no need to update historical data unless you want any older entries to reflect this new response. An example of this: On your original form, the responses to a given question were A, B, C, and D. Due to changes or advancements from a new grant cycle (for instance), responses to that same question should now be A, B, C, D, and E (with E as a new response). This scenario requires no changes to historical data and will not affect it in any way You would only need to revise historical data if any of it should have reflected E as a response but E wasn't available at the time.
- If you need to remove a response to an existing question on a form, this will affect historical data if that response was ever selected in prior entries. It if has never been selected, which you can check by filtering for that response, your historical data won't be affected. If the response was ever selected in prior entries, you have options for handling this:
- Option 1: Update the existing form by removing a response to a question, but leave your historical data as is.
- There are consequences for doing this, but it will not alter historical entries. The older data will still be in the CCB. You would only be able to view it, filter by it, or graph it outside of the CCB system, however. Exporting data to a .csv (unformatted Excel file), then converting it to .xlsx, would allow you to create your filters and graphs for the older data externally. The CCB form is no longer showing the deleted response, therefore you wouldn't see it associated with the question on current filters or graph options.
- Option 2: Update an existing form by removing a response to the question, and update your historical data as well.
- Using the Export/Import functionality in the CCB, you can filter any entries in Excel that have selected the deleted response, then, through find-and-replace, update it to other existing responses to the question. Your historical data would still be available to filter and graph in the revised form.
- Option 3: If you find in a new grant cycle (for example) there are enough revisions to an existing form that would involve deleting several older/outdated responses or even removing questions entirely for the new cycle, you could clone the whole form (see the steps involved in that process under Creating a New CCB Form at the top of the page).
- Note: if you remove an entire question from your form, not just a response to it, you will lose all historical data for that question, since the question (field/column) will no longer exist in any way.
- Import your cloned form into the same CCB as a second/new form by giving it a unique name that distinguishes it from the older form (e.g., "2024 Grant Cycle"). Edit your new form (with no data in it) by removing any questions or potential responses to questions, as well as adding new questions, and you will now have both forms (old with historical data, and new with no data yet) available within the same CCB. As you work with the new form, you could overlay old and new grant cycles from the two forms onto a single graph and choose whether to "combine" the data for a sum total or display each cycle's responses in different colors on the same graph denoted by the graph legend. (See more about "adding additional data" in the Graphs section under CCB Member Help.)
- If you revise data from the system and import it back into a CCB, you should export all three Observers in the .csv file. When a CCB entry is initially created by a user, the system generates three lines of data for each of the three corresponding Observers (1, 2, and 3). Outside of the Code field/question, all other responses are mirrored from the initial entry in Observer 1. If you're updating the Code field (only) for Observer 1 (only) and not wanting to alter Secondary Scoring responses (Observer 2) or Tertiary responses (Observer 3), then you should export/import only Observer 1 data. That's the one instance where you shouldn't export all three observers, however.
- Option 1: Update the existing form by removing a response to a question, but leave your historical data as is.
How to Import Accomplishments Data
Prepare Your File
- CCBs will export existing data in the .csv file format, which is an unformatted Excel file, but in order to import a file into the CCB, it must be saved first as an Excel document (.xlsx, not the older .xls format).
- Unless you are importing data for the Code field specifically or brand new Accomplishment entries, be sure to include all three Observers (1, 2, and 3) in your import file. This ensures they will all stay updated in the system. If you're importing new entries, include Observer 1 only, since 2 and 3 will be auto-generated by the system.
- There a few required fields for your import file. The following fields should always be included when importing data to a CCB:
- Initial fields typically located at the front of a form:
- Observer (number)
- Date (of activity)
- Name - not required but recommended
- System fields, located at the end of a form:
- MainID
- DataID
- CreatedOn
- CreatedBy
- ModifiedOn
- ModifiedBy
- Initial fields typically located at the front of a form:
- Aside from the required fields, be sure to include only the field(s) being modified. This means you should delete all columns/fields in your import file where the data is staying the same. There is no need to include this data. Extraneous fields will only add to your upload time, as well as the time it takes to manually map the document fields to form fields in the system (more on that below).
- Any blank fields/entries from an imported column will remove existing data. This can be helpful if you want to delete a response from an entry, but you should be aware that a "blank" field in a column is treated as a "remove" command.
- The Delete field (which is the final column in the document) is a system-command field which should only be used for deleting multiple rows/entries at once. This is a separate function, so do not attempt to delete entries/rows while simultaneously updating others, or adding new entries, as part of the same import file. The system will ignore the "delete" commands if you do. More on Batch Delete and how it works below.
- Make sure you only have one tab saved within your Excel file. The Import feature will not read any data from multiple tabs in the same document. You'll get an error message or see a blank import document.
- Make sure you have no filters saved in your Excel file. All filtered data should be removed in advance, so if you have filters applied to select specific data criteria, please do the following:
- Select all filtered data including the header row and copy it.
- Paste the copied data into a new tab, then go back to the original tab where the filtered data is and delete that tab from the document.
- Save the document again, now that it has no filtered data in it.
- Make sure you only have one header row at the top.
- Occasionally, you will see a second row with header data in it, before the actual Accomplishment data starts. Delete that second row from the document, if you see it.
- Close the file after you save it. You will not be able to import the Excel file if it's still open on your computer.
Import your file
- Select one of the three options in the dropdown menu (New Data, Revised Data, or Additional Data), and navigate to your prepared Excel document on your computer, through the finder.
- Wait for the "Available Excel Columns" to load in first.

- After they load, click the "Auto Map" button.
- The system should automatically map over any text that matches exactly.
- Note: The header row in your Excel document reflects the text from the "List Label" field when the question was set up. It is not the question (Label) that appears on the form for users to fill out unless the two were created with the same text. This is why manual mapping is needed to match the remaining sets of text for importing.
- For any fields that don't auto-map, click and drag the name from Available Excel Columns on the left to the matching empty field under Excel Column Name on the right.
- NOTE: Be sure to get the arrow in the middle of the box. That will help you avoid moving options to the wrong line. If you move something to the wrong blank line, you will have to start over. Click the image below to open it full-sized in a new browser tab.
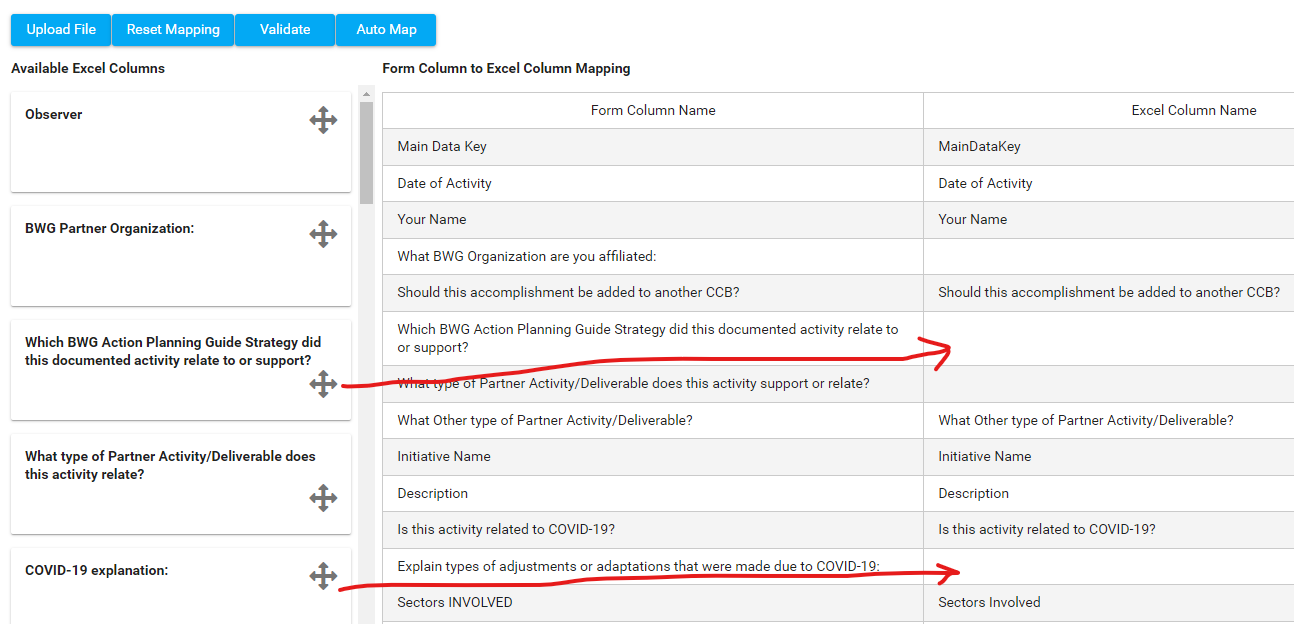
- NOTE: Be sure to get the arrow in the middle of the box. That will help you avoid moving options to the wrong line. If you move something to the wrong blank line, you will have to start over. Click the image below to open it full-sized in a new browser tab.
- Continue until all fields that should be updated under Available Excel Columns have been mapped to the right, with the following exceptions (which are system fields and will remain):
- Observer
- DataID
- Delete
- Clicked Validate.
- You will get a report document for downloading even if there are "no errors."
- If the data is validated without any errors, as expected, click Import. When you import you will see the spinning circle if your import is short. If the import takes longer with more data rows or columns to import, the spinning circle will turn into a status bar so you can see the progress of your import.
- You will get an error recorded for all responses left blank. This is a last-minute "check" to make sure you want to remove existing data from that field. The error in that row/entry will say "null" in the report. If you want to delete all data in that field, you should "ignore errors" and import the file.
- Import the file. In order to proceed, you will need to "ignore errors" first even if there aren't any listed in the report. This advances you to the import process.
- You should get an "Import Successful" message once the process has finished.
Batch Delete
- Batch Delete is a useful function of the Import feature. It allows you to delete multiple entries from the CCB all at once.
- This function must be isolated, meaning it can't be combined in your import document along with other updates, such as revisions to the existing data. Those should be imported separately.
- Whenever you batch-delete entries, you must delete all three Observers from the entry, or you will corrupt your data.
- Remove all extraneous fields other than the required fields from your document. They are not needed for Batch Delete.
- Place a lowercase "y" in the Delete column next to any entry, and you must include all three Observer rows.
- You don't need to import entries into the system that don't have a "y" in this column, so remove all other rows of data from your document first.
- Import your file. By importing this file you will remove all entries/rows with a "y" entirely from the CCB. This is irreversible.